March 11, 2026 | Music City Accelerator Team
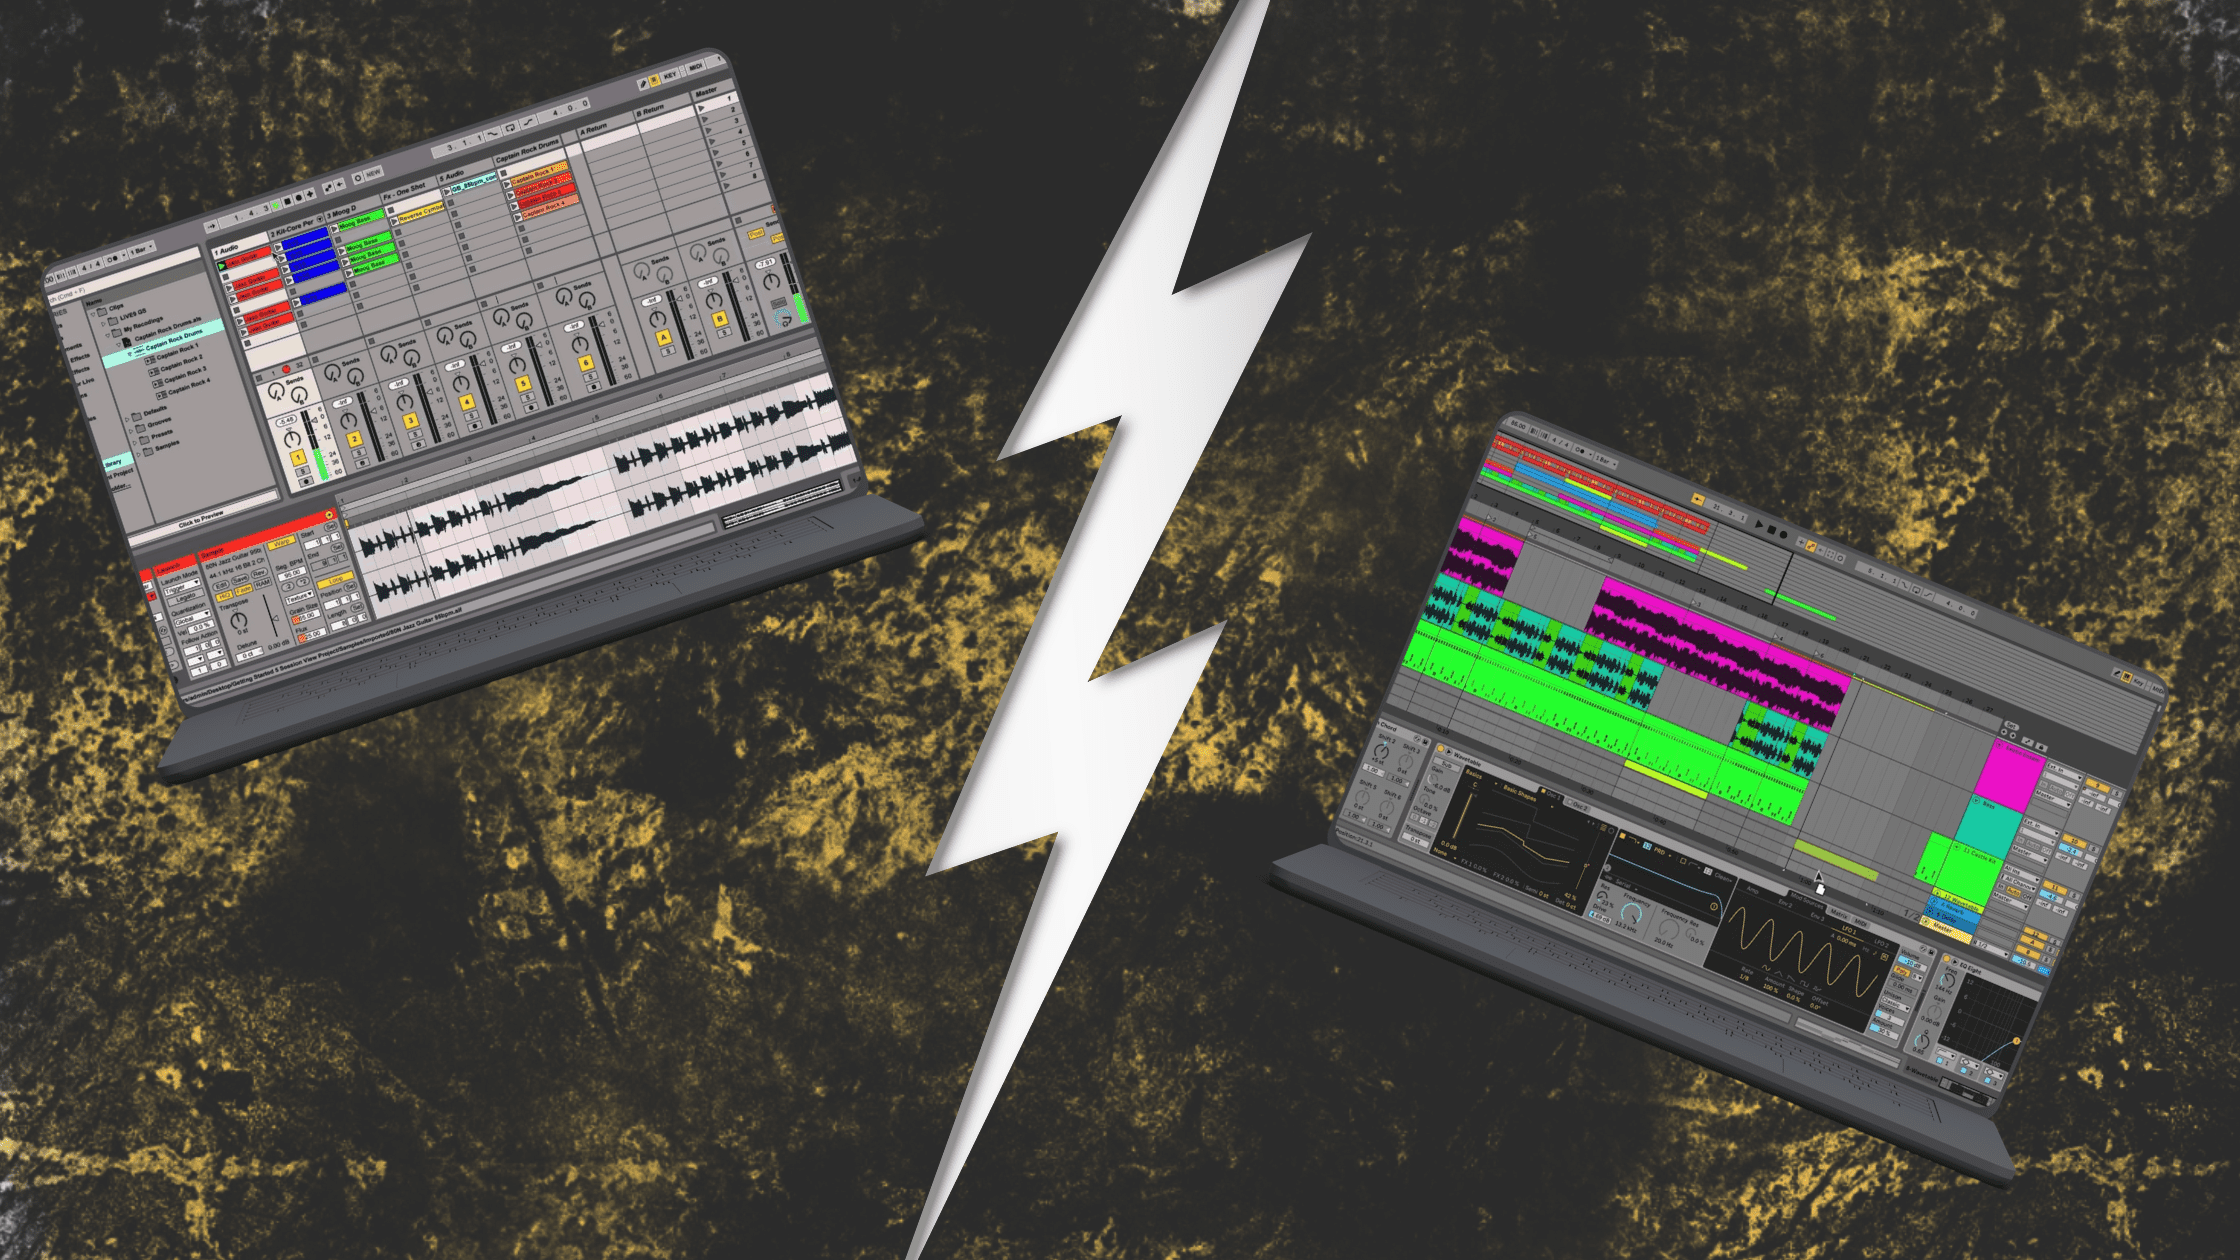
You know what trips up every new Ableton user? The two views. Most people open Live for the first time, see Session View staring back at them with that weird grid layout, panic, and immediately switch to Arrangement View because at least that looks like a normal DAW. Then they never touch Session View again.
Or they go the other way. They fall hard for Session View, spend months jamming out loops and scenes, and end up with a project file full of amazing eight-bar ideas that never become actual songs.
We’ve seen both types. Hell, we’ve been both types.
The thing is, Ableton didn’t give you two views just to confuse you. Each one solves a specific problem in the creative process. Session View is for the messy part where you’re chasing ideas. Arrangement View is for the focused part where you turn those ideas into something finished. You need both, and once you understand when to use each one, everything clicks.
When you first open Ableton, Session View is what you see. It looks nothing like Pro Tools or Logic or any other DAW you might’ve used. No timeline, no playhead moving left to right. Just this grid of empty boxes that doesn’t make any immediate sense.
Your first instinct might be to switch away from it. We get it. But stick with us here.
Session View exists for one specific purpose: catching ideas before they evaporate. You know how creativity actually works, right? You’re sitting there, you stumble onto a chord progression that hits, and your brain lights up. You need to capture that right now, not five minutes from now after you’ve set up a timeline and figured out what bar to start on.
That’s Session View. It’s designed to get out of your way. Each track runs vertically down the screen. Each clip slot is just a place to drop an idea. You record a drum loop, it goes in a slot. You try a different drum loop, that goes in another slot. Bass line? New slot. You’re building up this palette of sounds and ideas without committing to anything.
The horizontal rows are called scenes. Think of them as snapshots of your mix at any given moment. You load up one scene with your verse drums, bass, and chords. Another scene gets your chorus elements. Click a scene and everything in that row plays at once. You’re basically sketching out sections of a song without actually arranging anything yet.
And here’s the beautiful part: nothing is permanent. That drum loop you recorded three minutes ago? Try it with this bass line. Doesn’t work? Delete it, try another one. You’re exploring possibilities, not making final decisions. Session View doesn’t care if you change your mind seventeen times.
This is also why it’s perfect for live performance. Electronic artists and DJs use Session View on stage because they can trigger different combinations of clips on the fly. The energy in the room is peaking, so you launch into the heavier scene. Crowd needs a breather, drop into the breakdown. You’re reacting in real time, not following a fixed arrangement.
But here’s where people get stuck. They build all these great ideas in Session View and then have no clue how to turn them into an actual song. They’ve got eight different kick patterns, six bass lines, and four synth progressions, but no structure holding it together. They try to manually trigger everything in the right order and it’s messy and frustrating and eventually they give up.
That’s because Session View was never meant to finish songs. It’s where they begin.
Hit Tab and you’re in Arrangement View. Now it looks like every other DAW you’ve seen. Timeline running left to right, tracks stacked up, clips laid out from start to finish. There’s your playhead. There are your bars and beats. You can see the whole song from intro to outro.
This is where you take everything you captured in Session View and give it shape. This is where you make the actual decisions about what goes where, how long each section lasts, what transitions sound right, how the energy builds and releases.
Arrangement View is about precision. You can see exactly when each clip starts and stops. Need to move something? Drag it. Need to repeat the chorus? Copy it. Need to trim that intro because it’s dragging? Cut it. Everything is right there on the timeline where you can manipulate it however you want.
This is also where all the detail work happens. Editing audio, chopping samples, fixing timing issues, recording new takes. All the stuff that requires you to zoom in and get specific about what’s happening at bar 47, beat 3. Session View is too loose for that kind of work. You need the timeline. You need to see exactly where everything sits.
And this is where people get the wrong idea about Arrangement View. They think it’s boring or restrictive because it’s linear. But linear doesn’t mean uncreative. You’ve still got all the same tools and possibilities. You’re just organizing them into something that plays from beginning to end.
Even if you’re making weird ambient stuff or experimental noise or whatever, you still need Arrangement View at some point. Because eventually you need to decide how long each section lasts, where things fade in and out, how the piece evolves. You need structure, even if that structure is unconventional.
You can absolutely start a project in Arrangement View if that makes sense for what you’re doing. Recording a full band? Working with a click track? Already know your song structure? Go for it.
Arrangement View works perfectly as a starting point. But most producers find that the Session-to-Arrangement workflow gives them the best balance of creative freedom and focused execution.
Okay, this is where it gets confusing for everyone. You’ve been working in Session View, launching clips, jamming out. Then you switch over to Arrangement View to see what’s there, and you notice this little button in the top right corner glowing orange. It says “Back to Arrangement.”
What the hell does that mean? And why won’t it leave you alone?
Here’s what’s actually happening. Ableton’s transport runs continuously whether you’re in Session View or Arrangement View. When you launch a clip in Session View, Live stops playing whatever’s in the Arrangement for that track and plays your Session clip instead. Makes sense.
But here’s the weird part: even after you stop that Session clip, the Arrangement doesn’t automatically kick back in. That track just sits there silent until you explicitly tell Live to go back to playing from the Arrangement. That’s what the button does. It puts everything back to playing from the Arrangement timeline instead of from Session View.
When that button is glowing, it means at least one track is currently playing from Session View, or a Session clip was triggered and now that track isn’t playing anything. Click the button and everything snaps back to playing from Arrangement View.
This becomes really important when you’re recording your Session View jams into Arrangement View. Let’s say you’ve built a bunch of scenes and you want to capture them as an actual arrangement. You hit the Arrangement Record button, then start launching scenes in order. Live records every clip you trigger, every scene you launch, everything you do.
When you’re done recording and you switch to Arrangement View, you’ll see all your clips laid out on the timeline. But they look grayed out. That’s because you’re technically still playing from Session View. Those grayed clips are just showing you what got recorded. If you want to actually hear them play back from the Arrangement, you need to hit Back to Arrangement. The clips light up, the grayed-out state disappears, and now you’re playing from the timeline.
This can definitely confuse beginners. They record something, switch to Arrangement, hit play, and hear nothing. Or they hear the Session clips still looping instead of their arrangement. Or they’re trying to work in Arrangement but clips keep getting grayed out because they accidentally triggered something in Session. The Back to Arrangement button is how you take back control.
Once you get it, it makes perfect sense. It’s actually brilliant design because it lets you smoothly move between improvising in Session View and refining in Arrangement View without losing your place. But until you understand what’s happening, it just feels like the software is being difficult for no reason.
So you’ve got ideas in Session View. How do you get them into Arrangement View to build an actual song?
There are a few ways to do this, and which one makes sense depends on what you’re trying to accomplish.
The drag and drop method is the most straightforward. Select the clips you want in Session View, hit Tab to switch to Arrangement, and drag them onto the timeline. Done. They’ll land wherever you drop them.
This works great when you’ve already organized your ideas and you know where you want things to go. You’re manually assembling the arrangement piece by piece. The catch is that once you copy a clip from Session to Arrangement, they’re not linked anymore. Change the Session version and the Arrangement version stays the same. That’s actually useful because you can keep experimenting in Session without messing up your arrangement, but you need to remember they’re separate now.
Recording in real time is where Session View really shows its power. Instead of dragging clips around, you perform your arrangement live by launching scenes and clips, and Ableton records everything to the Arrangement timeline.
Here’s how it works. Make sure your individual tracks aren’t armed for recording. Hit the Arrangement Record button in the transport. Now start launching scenes in Session View in whatever order feels right. Intro, verse, chorus, bridge, whatever. Ableton is capturing all of it.
When you’re done, stop recording and switch to Arrangement View. Everything you just performed is now on the timeline, in the exact order you played it, with the exact timing you used. You’ve captured the structure through performance instead of planning.
This is perfect when you’re not totally sure what your song structure should be yet. You can try different combinations, feel out what flows naturally, capture it, then refine it afterward. And yeah, if your timing is sloppy or you launch something too early, that gets recorded too. But you can fix it later by moving clips around. This method is about getting the vibe and structure down first, cleaning it up second.
Consolidating to audio is the third option. Sometimes you don’t want to move individual clips around. You just want to bounce your entire Session performance down as audio and work with that in Arrangement.
Record your Session performance to Arrangement using the method above, then consolidate the parts you want. Select a region on a track, hit Command-J on Mac or Control-J on Windows, and Ableton bounces that section into a single audio clip. Now you’ve got clean audio you can chop up, rearrange, or process however you want.
This is also how you create stems for collaboration or for moving to other DAWs. Export your consolidated tracks as audio files and you’re good to go.
Here’s what works for most producers who know what they’re doing in Ableton. It’s not the only way, but it’s the way that keeps things moving without getting bogged down.
You start in Session View. Just open a new project and start capturing whatever’s in your head. Record some drums. Layer bass over it. Try a few chord progressions. Don’t think about song structure yet. Don’t worry about whether this is a verse or a chorus. Just get sounds down.
Work in clips. Each idea gets its own slot. Five different kick patterns? Record all five. Three versions of a synth melody? Get them all in there. You’re building options, not making final decisions.
Once you’ve got material to work with, start grouping stuff into scenes. This drum loop plus this bass line plus these chords sounds good together? That’s a scene. Call it Verse A or whatever makes sense to you. Different drum pattern with a lead melody on top? That’s another scene. Maybe Chorus 1. A stripped-down section with just bass and pads? Breakdown. Label them so you remember what they are.
Now start jamming. Launch scenes in different orders and see what flows. Does Verse A into Chorus 1 feel right? What about starting with the breakdown? This is where you discover your arrangement by feeling it out instead of planning it on paper.
When you stumble onto something that works, hit record and capture it. Just perform the arrangement in real time by launching scenes. Don’t stress about perfect timing. You’re getting the basic structure down.
Then switch to Arrangement View and start refining. Tighten up the timing. Add transitions. Duplicate sections that need to repeat. Cut anything that’s dragging. This is where you turn the rough sketch into something polished.
You’ll probably realize you need some new material at this point. A vocal take, maybe. Some extra percussion that doesn’t exist in your Session clips. That’s fine. Record it straight into Arrangement View. Loop the section where it needs to go, arm your track, and lay it down.
Mix and automate everything in Arrangement View. Volume rides, EQ sweeps, reverb automation, all of it happens on the timeline. You can still jump back to Session View if you want to try out different sound design ideas, but the actual mix lives in Arrangement.
When you’re done, export from Arrangement View and you’ve got a finished track.
This workflow works because each view does what it’s actually good at. Session View for catching ideas and experimenting. Arrangement View for organizing and polishing. Most professionals work this way without even thinking about it. It’s just how Ableton is designed to be used.
That said, the hybrid workflow isn’t some sacred rule you have to follow. There are plenty of times when you should just use one view and forget about the other.
If you’re recording a full band or tracking vocals start to finish, just use Arrangement View. There’s no point in messing with Session View when you’re capturing a complete performance. Set up your timeline, hit record, get the take. Session View doesn’t add anything useful to that process.
If you’re performing live or DJing, Session View is the whole point. Load up your scenes, map your controller, and trigger clips in real time. Arrangement View would just lock you to a fixed timeline, which defeats the purpose of playing live. One mistake and you’re stuck waiting for the playhead to catch up. Session View lets you react to what’s happening in the room.
If you’re making ambient music or modular synth stuff or anything that’s supposed to evolve naturally without a traditional structure, you might never need Arrangement View at all. Some music is meant to live in the moment, and Session View supports that perfectly.
And if you’ve been using Pro Tools or Logic for years and the timeline workflow is second nature, you can just work in Arrangement View the whole time. Some people come to Ableton from other DAWs and they’re perfectly happy staying in Arrangement for everything. That’s completely fine. They’re using Ableton like a traditional DAW and there’s nothing wrong with that.
The point is this: use the view that makes sense for what you’re doing right now. Don’t force yourself into a workflow that feels awkward just because some tutorial said it’s the “right” way. Ableton gives you options. Use the ones that actually help you work faster.
At Music City Accelerator, one of the first things we cover in our Ableton program is exactly this. Not just the mechanics of how Session View and Arrangement View work, but when to actually use each one and how they fit together when you’re trying to finish a track.
We start students in Session View because it removes that intimidation factor. You’re not staring at a blank timeline wondering where to put the first thing. You’re just filling slots with sounds, layering ideas, seeing what works. The pressure’s off.
Then we show them how to organize those ideas into scenes, how to record those scenes into Arrangement View, and how to refine everything until it’s actually done. This mirrors how most working producers actually operate, and it gives students a framework they can use on every project moving forward.
We also teach the shortcuts and workflow tricks that make switching between views feel seamless. Tab to switch. Hold Command while dragging to duplicate clips. Use Back to Arrangement to regain control when things get confusing. These aren’t just tips. They’re the muscle memory that lets you work fast without thinking about the software.
The goal isn’t to memorize every feature in Ableton. It’s to give you a workflow that actually works, so you can focus on making music instead of fighting the DAW.
Because at the end of the day, nobody listening to your track cares which view you used. They care about whether the song is good. Session View and Arrangement View aren’t competing tools. They work together. One helps you catch ideas, the other helps you finish them. Learn both and you’ve got everything Ableton has to offer.
Want to get faster at finishing tracks in Ableton Live? Music City Accelerator’s Ableton courses teach you the workflow techniques working producers actually use. We’re located in San Francisco and offer Ableton programs both online and in-person with dedicated studios and instructors who know this stuff inside out. You’ll learn Session View, Arrangement View, and how they work together to help you go from ideas to finished songs. Check out our Ableton Live programs and see what makes sense for where you’re at.
© Music City San Francisco 2026
Experience the vibrant rhythms and captivating melodies of Latin music as we feature live bands and electrifying DJ sets, showcasing a diverse array of genres from Brazilian Rhythms/Salsa/Cumbia/Latin Jazz/Spanish Rumba/Latin Rock/ Forró & global beats. Feel the energy as talented musicians take the stage, bringing their unique flair and passion to every performance.
Enjoy DJ sets spinning Latin Jams with Disco 80s/90s Funk/Hip Hop/Tropical Bass/Rock/Breaks & more.
Doors Open: 6 PM
Live Performances Begin: 7 PM-10PM
Step into the rhythm and soul of the city at Music City SF every Tuesday for an unforgettable night of live jazz! Wheter you’re a jazz aficionado or just looking to unwind, our talented musicians will transport you through the smooth, sultry sounds of Classic Jazz, Soul Jazz, and Jazz Fusion.
Door Opens: 6 PM
Live Performance Begin: 7 PM – 10 PM
Step into the unexpected at Music City SF’s Eclectic Night, where musical boundaries are meant to be crossed! Every Friday, we bring you an exciting mix of artists, from funk to jazz, hip hop to rock, and everything in between.
Doors Open: 6pm
Live Performances Begin: 7 PM-10PM
Every Thursday night, dive into the heart of the underground with weekly rotating performances featuring a fresh mix of musicians, cyphers, and DJs that keep the energy alive. Whether you’re here for smooth R&B vibes, soulful vocals, or fire hip-hop beats, The Music City Underground has it all.
Doors Open: 6 PM
Live Performances Begin: 7 PM-10PM
Step into a time machine of music and let the decades take you on an unforgettable journey! Relive the hits from the ’60s to the ‘2000s with incredible tribute performances that’ll have you dancing all night long.
Doors open at 6 PM.
Performances kick off at 7 PM.

From timeless classics to deep cuts that defined an era, keep the dance floor alive with the irresistible rhythms and smooth sounds that made Motown legendary. Don’t miss a night of soulful vibes and nonstop energy!
Door Opens: 6 PM
Live Performance Begin: 7 PM – 10 PM
Experience a thrilling variety of Rock, Folk, Blues, and Country music every Wednesday night! A high-energy event featuring live bands and DJs across six stages! From rock anthems to country classics and everything in between, this night promises non-stop entertainment and unforgettable performances.
Doors Open: 6 PM
Live Performances: 7 PM – 11 PM
The Singer-Songwriter + Performance Program is coming to Music City Accelerator, housed inside Music City Starfactory — a seven-stage live music hub in the heart of San Francisco. Step into a bustling ecosystem of artists and bands, rehearse in real studios, perform on stages streamed live to the world, and even stay on-site while you train. This is a one-stop launch pad for aspiring artists ready to grow fast inside a community that lives and breathes music every day.


Deborah Barsotti
Education director
deb@musiccitysf.org
More info coming soon!
Aprill Lacey
Executive Director
Aprill@musiccitysf.org


Contact Aprill for booking inquiries!